Formatted R reports
This page presents the basics of writing Quarto documents, an absolutely amazing tool for creating beautiful formatted reports that can easily incorporate graphs, tables, and statistics generated by R and the tidyverse.
1 Create new Quarto document
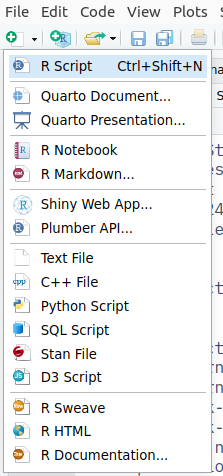
The first step to working with a Quarto document, probably obviously, is to create one. Go to the RStudio environment and click on the “New File” button—it’s the little green plus sign in the upper left of the environment—to start the process.
In this case, we want to create a Quarto document, so choose “Quarto Document…” from the drop-down menu.

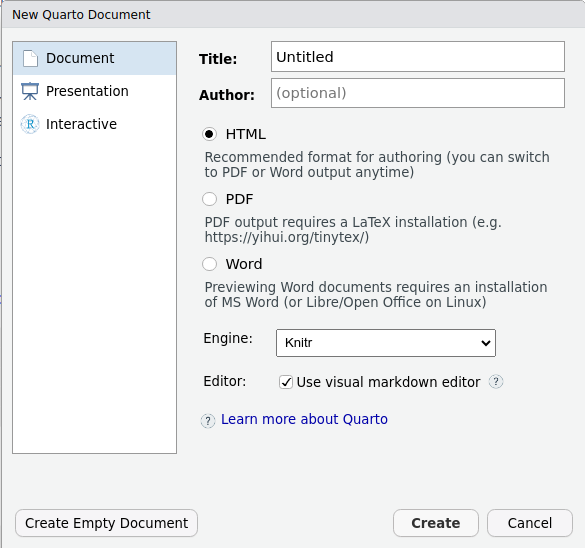
A dialog box will appear. You don’t have to change anything here. Just click on the “Create” button.

You should now see a very minimal Quarto document. The formatting bar at the top of the document allows you to point-and-click in order to format as you normally might in a word-processing document. These documents in the “Visual” mode generally look something like the following:

Finally, before we begin editing the document, we want to tell RStudio to render the document every time we save it. To render a document is to take the contents of the document seen in RStudio and turn it into a document in another form—either HTML, PDF, or Word.
You want to render a document every time you save it (if not more often) to ensure that your edits to the Quarto document in RStudio are valid and create the effects that you desire. If you wait too long to render a document after making lots of changes, it can be difficult to hunt down errors that you might have introduced.
This automation is easy enough to set up. Click on the box next to “Render on Save” above the document. This setting will be remembered from one editing session to the next so you won’t have to do it again. You can, again, see the “Render on Save” checkbox above the editing bar:

You are now ready to edit the Quarto document.
2 Save the document
We hope that it goes without saying (but we’re going to say it anyway), but you should save the document to the appropriate directory.
Do it now. Make sure the file extension is .qmd (Quarto Markup Document). If you don’t do this, then RStudio won’t know how to interpret it.
3 YAML at top
At the top of every Quarto document is the section called the Front Matter. (You can see extensive documentation here.) The Front Matter is all of the information between the three dashes --- at the top of the document. It is written in YAML—Yet Another Markup Language. (Markup languages are a dime-a-dozen, so this name is kind of a meta-joke.)
The following code is representative sample of what we use for our front matter in a Quarto-based report. Note that the whole strategy of defining this code is that once you do it, you don’t have to do it again! You can just refine it as you need to over time. Thus, our gift to you is this YAML code that you can just copy into the top of any new report that you make:
---
title: "Full Student Survey Report"
subtitle: Investigation of demo survey data
author:
  -   name: David Eubanks
      affiliation:
        - name: Furman University
          url: https://www.furman.edu
      url: https://www.furman.edu/people/david-eubanks/
  -   name: Scott Moore
      affiliation:
        - name: Palmetto Insights
          url: https://palmettoinsights.com
      url: https://palmettoinsights.com/about/
date: last-modified
date-format: long
highlight-style: pygments
execute:
  message: FALSE
  warning: FALSE
  echo: TRUE
format:
  html:
    number-sections: true
    toc: true
    code-fold: false
    anchor-sections: true
    link-external-icon: true
    link-external-newwindow: true
    code-block-border-left: "#582C83"
    code-block-bg: true
    code-line-numbers: true
    cap-location: top
  pdf: default
  docx: default
---
What follows is a line-by-line description of each component of the above Front Matter. You do not have to understand this or read this now! You will have to change the title, subtitle, and author once you copy this into your own document but, otherwise, you don’t have to change anything ever!
On to the details for those of you who are interested:
title: The name of your report. Set this as desired.subtitle: A subtitle. If you don’t want one, then delete this line. You might use this for the name or department requesting the report.author: Information about the authors. Here you can see information about 2 authors, but you can easily change the number of authors by deleting or repeating a block of lines.name: The name of the author.affiliation:name: The organization that the author is affiliated with.url: TheURLfor the organization.
url: TheURLpointing to information about the author.
date: You have several choices here:last-modified: shows the date that the document was last modified.today: the current date with the time set to midnight.now: the current date and time.- Just type the date as you want it to appear.
- Type the date in standard format (
yyyy-mm-dd) and let Quarto format it.
date-format: We tend to uselong, but you might want to tryfull,medium,short, andiso. More information about these date formats can be found on this page.highlight-style: This tells Quarto how to format code blocks. (Documentation can be found here.) Just usepygmentsuntil you find a good reason to use something else.execute: These tell Quarto options to invoke when executing R commands:message: If the R command outputs a message when executing,FALSEtells it to not display it. Use this setting for your final reports. While developing, you might want to set this toTRUE.warning: If the R command outputs a warning when executing,FALSEtells it to not display it. Use this setting for your final reports. While developing, you might want to set this toTRUE.echo: This option tells Quarto to display (TRUE) or not display (FALSE) the command’s output. This is almost always the setting you want in the YAML.
format: You are now going to start telling Quarto special instructions for each of the types of documents that it is going to render from this document.html,pdf,docx: RStudio is going to render three documents from this one Quarto document—an HTML document, a PDF document, and a Word document. We focus most of our attention on the HTML document because it is the most general and flexible.number-sections: Setting this totruetells Quarto to number the sections of the document for you automatically.toc: Setting this totruetells Quarto to create a clickable table of contents for you automatically.code-fold: Code folding has to do with whether or not you want to show or hide the R code in your document—for some audiences you will and for others you won’t. This item has three possible values:true: Hide the code but present a toggle that allows the user to see the code.show: Show the code but present a toggle that allows the user to hide the code.false: Show the code. This is the default value.
anchor-sections: Setting this totruetells Quarto to create anchors to all the sections in the document. This enables you to create links directly to a section (usually from another document).link-external-icon: Setting this totruetells Quarto to show an icon next to a link when clicking it will send the viewer to another document.link-external-newwindow: Setting this totruetells Quarto to open external links in a new window/tab.code-block-border-left: This is a formatting option that displays a border along the left edge of a code block.code-block-bg: This is a formatting option that tells Quarto to use a light grey color when presenting a code block.code-line-numbers: This is a formatting option that tells Quarto to number the lines in a code block.cap-location: This is a formatting option that tells Quarto where to put figure captions. It has three options:top: Put the caption at the top of the figure.bottom: Put the caption at the bottom of the figure.margin: Put the caption in the margin. Use this with care.
4 Set-up code that is not needed by reader
With RStudio there is an another editing mode called “Source”. You may prefer to use this method this when you’re inserting code, figures, and other text into the document. In any case, you’ll need to be able to read this markup language at some point, so let’s dive into it.
Click on “Source” in the upper-left corner of the document:

If you have not already done so, copy the YAML code above over the existing YAML code in the new document. Change the title, subtitle, and author.
Next, save the document to ensure that you made these changes correctly. Of course, when you save the document, it will be rendered for you to see.
After you have done so, then you can start working in earnest on the body of the document.
The first things to insert are the library() commands needed to set up the R environment needed to execute the commands that will be coming in the rest of the document. Just as when you start working in a new session you have to execute library(tidyverse), you have to execute that same command within this document because it forms its own R environment.
However, just because it is necessary does not mean that the reader needs to see it. Fortunately, Quarto allows you to turn off echo (so that the commands themselves aren’t shown), message (so that R’s responses to the commands aren’t shown), and warning (so that R’s warning messages aren’t shown). With the following code, we turn off echo before executing the library() command. You will almost always end up putting this at the top (not in the front matter but right after it!) of your document:
At this point, we have now finished setting up the document with boilerplate text and commands. It’s now time to write the text and insert the commands that are the reason for creating the document in the first place.
5 Ensure that you are on the right track
At this point, you might want to add a line below the above library command (outside of the R execution lines) that says Hello world!. Save the file and render it to ensure that it is set up correctly…just to be sure.
6 Formatting text
It is easy to type in regular and formatted text. You have two options.
6.1 “Visual” mode
We reference “Visual” mode earlier in the document (Figure 4). This mode allows you to edit your Quarto document as if it were a word processing document.
If you haven’t done so, play with this mode for a while, testing your ability to enter text of all types.
6.2 “Source” mode
As we did earlier, get into “Source” model (Figure 6). This allows you to enter Quarto markup directly. Enter the following into your document:
It should display something like this:
This is plain text. This is italicized and this is bold.
7 Execute R code
The ability of Quarto to integrate the results of R computations in its documents is the real reason that we are learning this tool. It’s easy enough to do, but you have to be careful.
- Type three (not two, not four)
backticks(not an apostrophe!) at the beginning of the line. This is the character that’s generally to the left of the1(one) on your keyboard. - Type
{r}(that is, the letterrwithin curly braces). - Hit the
Enter(orReturn) key twice. - Type three more
backticks, again, at the beginning of the line. - Hit the
Enter(orReturn) key.
You should have this in your document:
Then, starting at the blank line in the middle, type any R commands that you would like.
Consider this example that executes three R commands:
If your code is not working and you don’t know why, then add the following two lines to your code:
```{r}
#| message: TRUE
#| warning: TRUE
names(ipedsracecodes)
dim(ipedsracecodes)
as.data.frame(ipedsracecodes)
```
After you have debugged the code and it is working correctly, then you can either 1) remove those two lines, or 2) set their values to FALSE.
8 Headers
8.1 Basics
Headers (such as the “Headers” directly above this line) are delineated with hashes at the beginning of the line and a space afterwards followed by the text of the header.
```{r}
## Top level header

This is the text under the header.

### Sub-header

This is text under the subheader.

### Another sub-header

This is more text under another subheader.
```
Your top level header should have two (yes, 2) hashes. This is because the document title is assumed to be the only header in the whole document that has one hash (even though you don’t type this anyplace other than in the YAML at the top).
8.2 Cross referencing
If you want to be able to cross-reference the section number in your text, then provide an identifier for it. The benefit of typing this:
Now, consider @sec-headersxref for a moment...instead of
Now consider Section 3.2 for a moment...is that, if you were to insert a section before the section that you’re referring to, Quarto would automatically update the section number for you if you used the @sec-headersxref form! And, we don’t know about you, but we’re always re-arranging our documents and would love to have the computer handle this for us!
The form of the identifier must be {#sec-SOMEWORDSNOSPACES}. For example, here (Section 3—mouse over this link and see what the link is called) I am referring to the header of the third section using the text @sec-yamlattop since I had created the identifier as {#sec-yamlattop}. This cross-reference allows the user to click on the link to take them to that referenced part of the document.
```{r}
## Top level header {#sec-toplevelheader}

This is the text under the header.

### Sub-header {#sec-subheader}

This is text under the subheader. I'm referring to
the @sec-toplevelheader.

### Another sub-header {#sec-subheaderagain}

This is more text under another subheader.
```
If you aren’t going to make any cross-references, then feel free to ignore this capability until it is needed.
9 Figures/images
The need arises to add a figure to your document. Quarto’s markup language makes it easy to do so, but also adds all of the options that you might need.
In the following, we show the very basics of how to add a figure/image to your document — and this might be all that you ever have to do! — and then take you through many of the most popular options that you might want to include in your document.
9.1 Basics
This is the code that you need to include in your document if you want to display an image file. Ensure that the image is in your working directory before you enter this code in your document! If you do this, then you do not have to enter any path information along with the name of the file.
It should display the image something like this (containing your image, of course):

However, heed this well:
Warning!! — Be sure to leave one blank line after the figure! If you don’t do so, then it can cause some problems (with cross-referencing, among many other things).
9.2 Add a caption
If you want to add a caption to your image, then add text within the square brackets:
This is the result:

As we write this, the current version of Quarto center-aligns the image after adding a caption.
9.3 Align the figure
To change the alignment of a figure, add the fig-align attribute as follows:
{fig-align="left"}This is the result:

The figure should now be center, left, or right aligned as you specified.
9.4 Add a cross-reference
As we showed in Section 8.2, we sometimes want to add a reference to a section. Well, the same need arises for figures. In order to do so, add the following to your document:
{#fix-XREFWORDS}Of course, you will insert your own text for XREFWORDS — just do not include any dashes or spaces.
Here is the result when I show Figure 7:

Note that you should only define a cross-reference name on a figure if you have defined a caption. Why is that? Because by defining a caption, you give the figure a number…and the number is how a cross-reference refers to the figure.
9.5 Add pop-up text
Put your cursor over the image immediately below and don’t move it. Text should pop up over it — maybe not surprisingly, this is referred to as “pop-up text”.
You can add this for your image in the following manner; just be sure to leave a space after the name of the file.
{#fig-XREFWORDS3 fig-align="left"}As you have already seen, this is the result:

9.6 Add text for screen readers
For screen-reader applications (frequently used by the visually impaired), it is useful if your images have “alternate” text defined. This text describes the image for the visually impaired reader. You can do this by defining the fig-alt attribute:
{#fig-XREFWORDS4 fig-align="left"
fig-alt="text for screen readers"}The image will generally not change in any way for people reading a document in the standard way. Note that the following doesn’t appear any different from the previous figure:

It is good practice to define this text when you will be distributing a report more widely (or, of course, when you know a visually impaired person will be receiving the document).
10 Lists
One of the real strengths of the Quarto language is how easy it makes to enter lists, either unordered (bulleted) or ordered (numbered).
10.1 Unordered lists
Consider the following text:
-   Item 1
-   Item 2
    -   Sub item 1
    -   Sub item 2
-   Item 3
This generates the following, an unordered list with three items and two sub-items under the second item:
- Item 1
- Item 2
- Sub item 1
- Sub item 2
- Item 3
Warning — If you don’t get the spacing right when you enter the above, you will not get what you want.
To be clear, this is what we actually typed:
-<TAB>Item 1
-<TAB>Item 2
<TAB><TAB>-<TAB>Sub item 1
<TAB><TAB>-<TAB>Sub item 2
-<TAB>Item 3
Equivalently, we could have typed this:
-<SPACE>Item 1
-<SPACE>Item 2
<SPACE><SPACE>-<SPACE>Sub item 1
<SPACE><SPACE>-<SPACE>Sub item 2
-<SPACE>Item 3
However, if instead of typing the two TABs we had typed just one TAB in each instance, then it would not display the sub-items indented:
- Item 1
- Item 2
- Sub item 1
- Sub item 2
- Item 3
The same thing happens if we use SPACEs instead:
- Item 1
- Item 2
- Sub item 1
- Sub item 2
- Item 3
Thus, mind the number of TABs (or SPACEs) when creating sub-items.
10.2 Ordered lists
This is where Quarto really shines! It automatically numbers (and re-numbers) list items as you enter them.
10.2.1 Basics
Here is how you might enter an ordered list. Be sure to include one TAB or SPACE after the period.
1.    Item a
2.    Item b
3.    Item c
4.    Item d
This is what it produces:
- Item a
- Item b
- Item c
- Item d
Alternatively, you can let Quarto number the items for you. Simply put a 1 for the first item and a 2 for all other items, as shown here:
1.    Item a
2.    Item b
2.    Item c
2.    Item d
Quarto will take care of the numbering for you!
- Item a
- Item b
- Item c
- Item d
10.2.2 Sub-items
You can insert sub-items (and sub-sub-items) as needed. You have to use the same care with double TABs (or SPACEs) as above, so we won’t belabor the point here.
Notice that, again, for the sub-items and sub-sub-items, you can use 1 for the first item in the numbered list and 2 for all other items. Also note that you can have unordered lists embedded within ordered lists:
1.    Item a
2.    Item b
2.    Item c
      1.    Sub item a
      2.    Sub item b
2.    Item d
      -   Sub item (unordered)
          1.    Sub sub item c
          2.    Sub sub item d
          2.    Sub sub item e
      -   Sub item (unordered)
The above displays the following:
- Item a
- Item b
- Item c
- Sub item a
- Sub item b
- Item d
- Sub item (unordered)
- Sub sub item c
- Sub sub item d
- Sub sub item e
- Sub item (unordered)
- Sub item (unordered)
11 Additional resources
This is a straight-forward introduction to quarto. This is a good video. So is this one.

