Using the Console
1 Options for executing R commands
The analyst can execute R commands in at least three basic ways:
- Direct execution: Write and execute code directly in the
Console(bottom left corner). This can be useful when an analyst is first getting to know R. We quickly cover the basics of this below. However, this approach can quickly become tiresome and/or counterproductive. - Simple scripting: This leads us to the second approach (covered on this page) — writing code in a simple scripting file. This allows for much simpler editing and iteration of commands and command sequences. It also simplifies the documentation process and ability to run previously-created sequences of commands.
- Formatted reports: The third means of executing R commands is through creation of formatted reports (which are covered on this page). This approach is quite powerful, allowing the analyst to use an easy-to-learn document description language to created reports as diverse as HTML pages, PDF files, presentation (e.g., PowerPoint) files, interactive web pages with embedded controls, and whole Web sites. (In fact, this site is created with these tools.)
Let’s get on with introducing direct execution of R commands within the Console. As mentioned above, you can find the other two approaches covered in the “Reporting” section (under “R skills”) in the left menu.
2 Direct execution using the Console
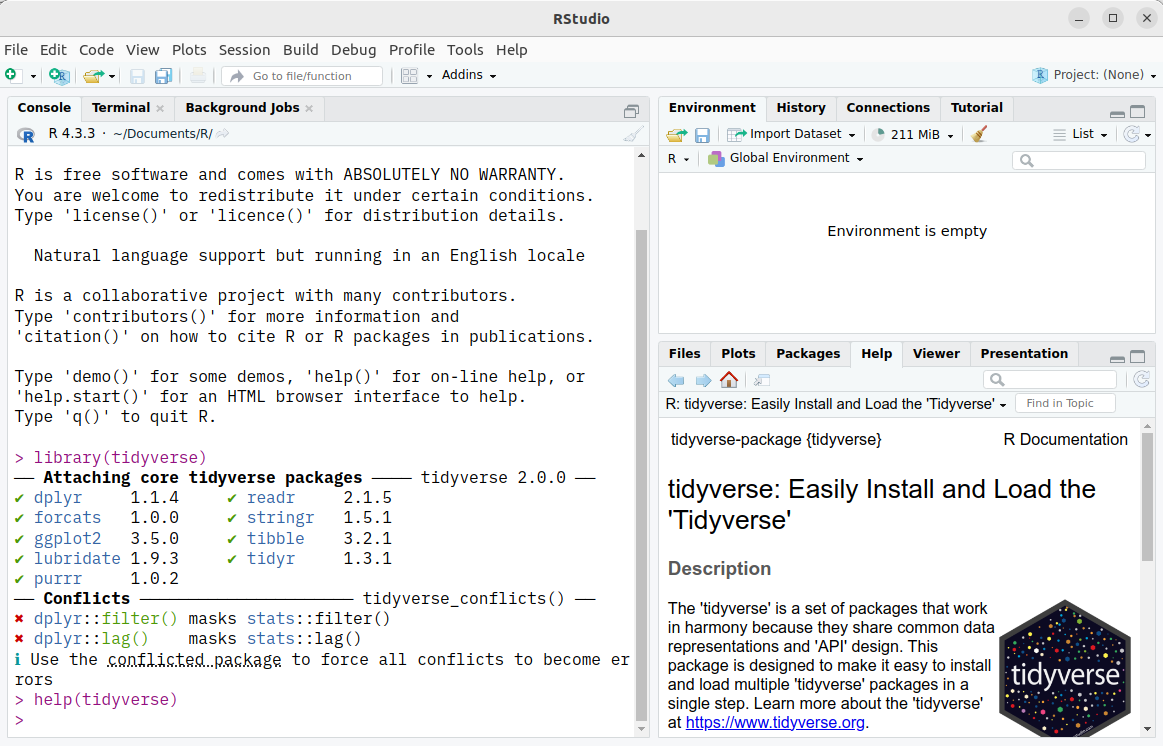
This is the best way to explore and execute simple commands. The Console is usually found on the left — and, sometimes, on the bottom left — of the R Studio interface.

An aside: The
TerminalandBackground Jobstabs that share this same screen real estate are generally quite important but less so for our present purposes. Given that, we skip them for now.
Look for the prompt (the > on the last line of the Console). It is in the very bottom left corner of the above image.
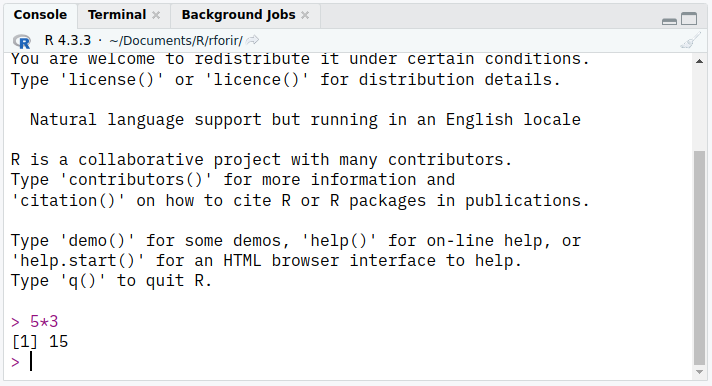
Type the following at the prompt in the Console of your installation of R Studio. Hit the Enter key when you have entered 5*3 at the prompt, as shown here:
It should now look something like the following — and, don’t worry, we know we are being (possibly) overly careful at this step, but we want to make sure that we don’t lose anyone at the very beginning!

Let’s focus on that part that most matters to us at the moment:

Interpret this in this way:
[1]: The line number of the output. R is telling you that this is the first line of output of the previous statement. (Of course, there’s only one line so this seems somewhat redundant, but you will see the utility of this below.)15: To the right of the line number is the output of the statement — in this case,15.
Soon enough, you will read this type of output without a second thought.
Here’s an example of using the seq() function to create a sequence of dates:
seq() function for dates
FYI, more details about how to construct this function can be found on this page or by typing help("seq") in the Console.
Interpret the above command in this way:
as.Date("2019/1/1"): create aDateobject representing January 1, 2019.by="month": create the sequence of dates by month.length.out = 24: create 24 dates in the sequence.
In summary, the command should be interpreted as “Create a sequence of 24 dates one month apart starting with January 1, 2019.”
As you can see in the output to the function, the 21st, 22nd, 23rd, and 24th items in the vector returned by the function are shown on the line beginning with [21].
3 Useful shortcuts
When working within the Console, we have found it useful to be familiar with (and use) the following keyboard shortcuts.
| Description | Mac | Windows/Linux |
|---|---|---|
| Navigate the command history | Up/Down arrows | Up/Down arrows |
| Popup the command history | Cmd-UpArrow | Ctrl-UpArrow |
| Show all keyboard shortcuts | Alt-Shift-K | Alt-Shift-K |
| Change working directory | Ctrl-Shift-H | Ctrl-Shift-H |
